


Section 1: Identifying and investigating design possibilities
1
Situation & Contexts
Key components on this page
-
Analysing the 3 contexts given
-
Describing situations related to
the contexts -
Problem Areas
-
Visual mind mapping & exploration
-
Moodboards
-
Client Profile
-
Research Plan
Page Aim
The aim of this page is to demonstrate that you have researched and understand the three context choices given by the exam board. Using research, mindmaps and moodboards, show the examiner that you understand the current problems and situations consumers face in relation to each of the contexts. Explore all three contexts and then indicate which one you find the most interesting and meaningful for your project.
Situations
To analyse the situations for each context, discuss the everyday problems or needs of consumers. For example, if one of the contexts is "designing for climate change", you can discuss the current environment, pollution and how people struggle with global warming, rising temperatures and dealing with unpredictable weather events in their lives. What specific areas of people's lives can be affected by each of the contexts?
Problem Areas
Discuss the current problems people face with each context. A good approach is to explore Gaps in the Market where products that people need may not exist or are difficult to come by based on the context. Aim to discuss three problems different people face for each context.
Mindmaps & Moodboards
As you are still exploring possible approaches and problems to solve, visualising your exploration using mindmaps and moodboards is effective. You can create an industry mindmap, exploring the different industries and jobs related to a context. You can also create moodboards of products that relate to the contexts. Make sure to add annotations to your mindmaps and moodboards, showing your thoughts and developing ideas.
Example Page

2
Primary Research
Key components on this page
-
Customer Feedback Surveys
-
Survey & Feedback Analysis
-
Qualitative & Quantitative Research
Page Aim
To demonstrate you are not designing a product for yourself, you must talk to potential customers or clients. A great way to gather feedback on what customers know or feel about the contexts is to make a Google Forms survey. Once you send out the survey and analyse the responses, you will show an awareness and respect for your customer's opinions and needs using primary research. Your direction is based on customer feedback, just like the real product design industry.
Customer Feedback Surveys
Create a Google Form survey with 10 - 15 questions. These questions aim to help you understand what potential customers think or know about the context you have chosen. At this stage, you should not show you already have a product idea in mind. You can also ask questions to find out about customer preferences; for example colour preferences, size and shape of product preferences, prices and affordability etc.
Survey Analysis
Once you have received enough responses to the survey, place diagrams of the data on the page. You can include bar charts, pie charts and even quotes from the responses. Critically analyse a minimum of 10 responses to determine what, how and why customers responded in the way that they did. Analyse how the use of surveys and customer responses will help you moving forward when designing your product.
Qualitative vs Quantitative Research
When you create your Google Form survey, it is a good idea to ask questions that will get back different types of data. Qualitative data is data that looks like customer quotes, comments, written feedback, verbal responses etc. Quantitative data is data that you can get numbers and charts from, such as pie charts with numbers or ratios of responses. Mix it up so the page has a variety of pulled data from your surveys!
Example Page

3
Secondary Research
Key components on this page
-
Existing Product Analysis
-
ACCESSFMM
-
Product Use Environments
-
Ergonomics & Anthropometrics in
product designs
Page Aim
To demonstrate that you are knowledgable about Product Design, it is important that you understand how companies around the world design, create and market their products. On this page you will use secondary research to show independent research skills in understanding how products are designed, created and marketed for success. The overall impression is that you are more of a professional in understanding products.
Existing Product Analysis - The work of others
Find a product using online sources that you find very interesting. The product should somewhat relate to your chosen design context. Place a large image of the product at the center of the page with a few other images of the product from different views. Use ACCESSFMM to analyse all factors relating to the design and manufacturing of the product. Be as detailed and specific as possible! Once done, write about your thoughts and ideas while analysing the product. Do you think this analysis has helped you? How will this exercise help you move forward in your project? Are you inspired by anything you have found in the analysis?
Product Use Environment
While analysing the existing product, discuss where the product would most likely be used and why. If the product is used in a particular environment, how has the design of the product been determined to be appropriate for that environment? Consider how the end user of the product has been considered by the company. Does the product affect the environment in a positive or negative way? How so?
Ergonomics & Anthropometrics
To show your keen understanding of product comfort and usability, you can also discuss the ergonomics of the existing product you are analysing. How has the product been designed to be comfortable and safe for users. People grow to be all different sizes and proportions. You can also talk about the dimensions and sizing of the product, or the choice in shape to allow the maximum amount of customers to use the product.
Example Page

4
Early Concepts
Key components on this page
-
Design flexibility
-
Organic and Geometric Scribble Drawing
-
Onshape 3D modelling (simple concepts)
-
Annotations, captions and labels
Page Aim
On this page, you are demonstrating your design flexibility and creativity. Even if you already have a good idea what your product design will be, you must avoid sketching early ideas that have a similar and targeted design. This will show "design fixation" and a lack of design flexibility which can lose marks. Have fun with this page, being explorative and unrestricted in new possible ideas for shapes, forms and functions for your product idea. Always remember to annotate and label your drawings so the examiner understands what you are thinking about between sketches.
Design Flexibility
It is important at this stage to show full possibility in the direction your product design might go in terms of shape, function and form factor. The early concepts on this page, either sketched or 3D modelled, must explore without a specific intentional design. You can drop hints in your early concepts of your actual product idea.
Organic and Geometric Scribble Drawing
As seen in the page example, a great way to explore different shapes for a potential product is using the Scribble Drawing method. Don't think too much, just put your pencil to paper and create a series of curvy organic scribbles. Let the lines overlap and cross each other. Once you have a mess of scribbles, look at the shapes created and create some product form factors. Be open minded. Once done, repeat the activity but this time using only straight geometric lines. Aim to draw a minimum of 15 sketches with added details. As always, annotate, caption and label using ACCESSFMM and your thoughts.
Onshape 3D early models
To score even more marks, you can choose a few captured sketches from the previous scribble activity and very simply 3D model the form factors using Onshape. Avoid spending too much time or adding too many details when making your 3D models as this is still the early concept phase. Take screenshots of a minimum two 3D models converted from the scribble drawing. Place the screenshots on this same page and analyse. Be sure to add a few screenshots of you making the 3D models in Onshape.
Example Page

Section 2: Producing a Design Brief & Specifications
5
Design Brief & Specifications
Key components on this page
-
Final context selection
-
Final customer identification
-
Final problem & situation to be solved
-
Initial Specification Table (ACCESSFMM)
Page Aim
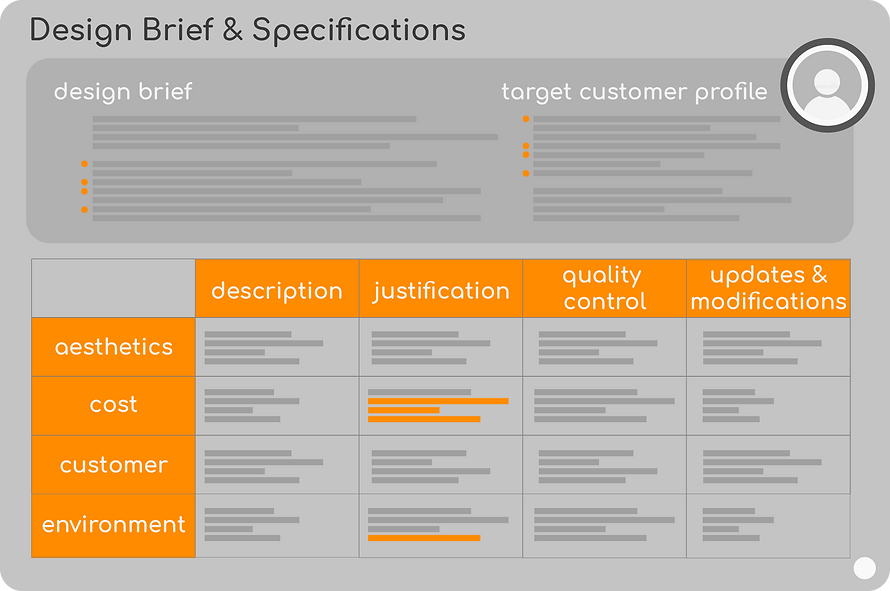
This page is arguably the most important page in the whole NEA portfolio! You must spend extra time to ensure this page is clear and understandable. The aim of this page is to lay out the design brief of the project and then describe the product you are going to make in specific detail. The design brief should be written in a way that a third-party manufacturer can read it and completely understand what product they need to make and why. After understanding the design brief, the person should be able to read your specification table for precise information on what needs to be made.
Iterative Design: The Specification you create on this page will definitely change as you start more specific designing and making of your product idea. This is okay and even gets you more marks! Remember to add the updates to this table during your making. Highlight the updates with a different colour text and add the date when the update was decided as seen in the example pages.
Final Context Selection
In your written design brief, make sure to clearly state the context of the product's design and how the product aims to solve a problem related to the context.
Final Customer Identification
In your written design brief, make sure to clearly state who is the target audience. Be specific when describing the customer by detailing everything about them, much like describing your friend and their life.
Final Problem & Situation to be Solved
In your written design brief, make sure to clearly state what specific customer need, gap in the market or problem area you are designing your product to solve.
Initial Specification Table
Using ACCESSFMM, you will detail each aspect of your product design idea. A specification table is full of conviction and must be followed, so avoid describing elements with "It might be...", "It should be...", "Perhaps it will have..." Instead, start each description with, "It will be...", "It must be..."
A third party manufacturer should be able to read all details about your product idea and follow your instructions carefully. A good specification table will have precise measurements, precise materials, precise colours and other ACCESSFMM factors.
Example Pages

Section 3: Generating design ideas
6
Initial Designs
Key components on this page
-
Sketching
-
Range of ideas
-
Ongoing customer ratings & feedback
-
Selecting best design
Page Aim
Now that you have created your Specification Table, you need to explore how your product could look and function. Similar to the Early Concepts page, on this page you will demonstrate a wide range of ideas through sketches and simple 3D modelling shapes. The aim of these initial designs is to continue showing flexibility and openness to what your product could look like. Avoid design fixation if you already have your product shape in mind. Somewhere in these initial design sketch pages will be one design that will be developed in more detail to become your final product solution.
Range of ideas
A fast way to generate a range of sketches is to explore different geometric and organic shapes. For example, if you are designing a new type of pencil case you can draw the pencil case shape in different geometric shapes such as a rectangle shape, ellipse shape, triangular shape, hexagonal shape, cylinder shape etc. Organic shapes can be inspired from nature such as a leaf shape, a bug shape, a water drop shape, a snail shape etc.
As you explore the different possible shapes of your product idea, make sure to critically annotate your ideas and add images that inspire the form factor for that sketch.
Ongoing customer feedback & ratings
This section is full of wide ranging ideas for possible shapes and functions of your product. Making a decision on which is the best design to develop is ultimately up to you, however you always need to get customer feedback first. Around your sketches, ask a friend or customer to rate your ideas on a scale. Allow them time to read your annotations and labels to understand the product's specifications. This will score you higher marks because you are always keeping the customer's opinion in mind.
Selecting the best design
One of the designs in your initial ideas has the most potential. Highlight this sketch or 3D model on the page and explain why you feel this is the most marketable, functional and aesthetically pleasing design. You are ready to start developing this design further!
Example Page

7
Project Specific Research
Key components on this page
-
Additional secondary research
-
Main design feature/Unique Selling Point
(USP) -
The work of others
-
Specific component and
manufacturing processes
Page Aim
As you continue to generate ideas for your product design, there may be a key feature, mechanism or component found in your product that needs more specific research. On this page, you aim to demonstrate even more understanding about how the key feature of your product functions or looks. This page will be intensive research on that specific part or feature of your product that makes it unique. This feature is called the Unique Selling Point and will become the main marketing topic to sell to customers. You need to know everything about this feature through additional secondary research on this page.
The work of others
Use secondary research to find a company or product that has a similar feature, theme or component to those found in your product design. Research and evaluate the history, success story and specific functionality of the company and how their product was made. This page is not the same as the Existing Product Analysis because it is focused on a specific component or feature, rather than the whole product itself.
Specific component or manufacturing process
Example: Let's say you are designing a new sports shoe for football. Your design as a USP featuring a special type of sports shoe sole that is lightweight, hollow and 3D printable using a specific rubber plastic. Anyone at home can 3D print their own football soles and attach them onto the bottom of their shoes.
On this page, you will research all about elastomer rubber materials that are 3D printable. You will also show research on 3D printing rubber capabilities. You can also add additional research on foot anatomy and shoe components. Finally, you can do a full analysis on Nike, one of the most famous shoe companies in the world. You can detail the process of how Nike creates soles for shoes and their manufacturing process.
After completing this page, you now demonstrate specific knowledge about the key feature of your product idea!
Example Page

Section 4: Developing design ideas
8
Developing Ideas
Key components on this page
-
Narrowing & focus of design
-
3 variation drawings & physical protoypes
-
Onshape 3D models of each variation
-
Specification check (meeting requirements)
-
Customer ratings and feedback
Page Aim
Now that you have chosen an initial idea and you have done further specific research related to a feature of your product, you must now demonstrate development of your idea even further. On this page, you will create a minimum of three variations of your product's form factor and function. This variations should look similar with a few key differences between the drawings and 3D models. This section is all about becoming more and more specific on the final design by exploring slight variations while still following your specifications. The work in this section will lead to the final solution page.
Narrowing & focus of design
You have already created an early concepts page and an initial idea page of sketches. On this page, you aim to draw three larger and more detailed ideas of your product. Think of the process like a funnel that gets narrow towards the end. You started off generally looking into the context, then creating a variety of sketches. Now you are getting more specific for your design and creating the best three or more versions of the design.
Three variation drawings & physical models
The 3 drawings and 3D models of your product idea can look similar in shape and form factor, but target changing one or two things about each design to show you are still developing the final idea. This is also a great point to introduce some more detailed 3D model prototypes of the three variations. To score higher marks, you must create physical models using prototyping materials in the workshop as well as digital 3D models using apps such as Onshape.
Specification Check
As you develop the three or more ideas to be more specific, you should always be checking your ideas are meeting the initial specifications you made earlier. You can create a specification check section on the page that identifies if certain specifications in your design need to change based on new ideas, project specific research or problems in the design. You can also go back to the Specifications table and add updates with timestamps.
Customer feedback and ratings
As always, once you complete a new design page you can ask your friends or customers to rate which of the three designs the prefer most. Ensure you are always listening to customer feedback to support your design decisions. Place any ratings or customer quotes around your drawings too.
Example Page

Final Design Solution
Key components on this page
-
Isometric Drawing of final idea
-
Dimensions and sizing
-
Detailed Onshape 3D model
-
Final evaluation of design against
customer needs
9
Page Aim
This page demonstrates all your research, planning and designing to reach a point where you have a final and detailed product design that relates to the design context you have chosen. This final design page will be much more accurate, detailed and provide more supporting technical drawings and 3D renders of your top product design idea so a third-party can refer to and manufacture your product with ease.
Please remember, during the actual physical making of your product you may still encounter problems and design changes. If there are any further changes to the design such as a change in materials, sizing or functions, they need to be clearly logged in the steps of the Production Diary section. Additionally, these updates can also be added to the Initial Specifications table with timestamps and in a different colour.
Isometric drawing of final idea
Up until now, you have been creating sketches and simple physical and digital 3D models. For scoring higher marks, you will now need to draw your final product idea using a technical drawing method such as Isometric Drawing. Take your time to draw your product in isometric view with as much detail as possible. Make sure your drawing is neat and very clear, like an engineering drawing. Add colour and shading to your drawing to demonstrate the aesthetic design choices.
Dimensions and sizing
Around your isometric drawing, you must provide accurate measurements for all parts of your design. The more detailed your measurements or dimensions are, the easier a third-party can recreate your product in a factory. Ensure your dimensions match up with the dimensions stated in your Initial Specifications page, or update the dimensions there if they have changed since then.
Detailed Onshape model
To score higher marks in this section, you can present a more detailed digital 3D model prototype of your product idea using apps like Onshape or Blender. Present images of the model on the page in different views, with annotations and labels. Please remember, this digital 3D model is still not the actual production 3D model. It is still a simplified version without exact features. The steps of making your actual digital 3D model with every detail must be documented in the Production Diary section and will be much more detailed with precise features.
Example: Let's say you are designing a new type of humidifier. On this page, you will 3D model an accurate representation of the shape and size of the humidifier design in Onshape, however the model will be missing precise features like the port for USB-C charging or holes for an LED lights to shine through. Instead, the model will cover only the overall shape and placement of features.
Final evaluation of design against customer needs
Now that you have completed the final solution page and provided much more accurate technical drawings and 3D models, you can evaluate your entire design based on the design context you have chosen and the customer you are designing for. You can use ACCESSFMM and your Specifications to assess your own final design on this page. Has it met the specifications you set out? Is there still a strong link to the design context you have chosen? Do you foresee any challenges with the making your product design in the workshop?
Example Page


Final Orthographic/Exploded View Drawing
Key components on this page
10
-
Orthographic drawing: Plan, Side, Front
-
Exploded view drawing
-
Sectional view drawing
-
Dimensions and annotations
-
Sub-assemblies
-
Magnified detail views
Page Aim
In addition to the isometric view drawing and 3D renders presented on the previous page, no product design for manufacturing is complete without an Orthographic Projection Drawing. In manufacturing, orthographic technical drawings are the standard way engineers and builders communicate the dimensions, viewing angles, proportions and geometry of a product so less production errors occur. Creating an orthographic reference material will score you high marks as you demonstrate using industry standard techniques to visually communicate your ideas for manufacturing.
Orthographic drawing: Plan, Side, Front
There are two ways you can create your orthographic drawing; traditional or digital.
The traditional method will use paper, pencils, black ink pens, a set square and a protractor. This will need more time and skill but will demonstrate much more effort. Drawing traditionally is more direct and you will feel more connected to your process.
The digital method is much faster and easier but it does rely on Onshape 3D modelling skills and a 3D model to have already been made. For this method - which is highly recommended - you must model a detailed final version of your product idea as shown in the isometric view drawing . Within Onshape, the different views of the 3D model will be automatically created onto a design sheet in the app with just a few clicks. Measurements can also be automatically added to the orthographic through Onshape's features. Check out the example page for an orthographic projection created in Onshape.
Exploded view drawing
Alternative to creating an Orthographic drawing, you can create an Exploded View drawing instead. Exploded views show all parts of the product separated out as if it is exploding apart. All parts can then be annotated, labelled and dimensions added. Only choose this drawing method for this page if your product idea has more internal parts you would like to show. Some 3D apps can do this automatically once the 3D model is completed in different parts.
Sectional view drawing
Showing the cross-section of your product is a sure-fire way to get more marks. This visual communication method works best if you have already 3D modelled your final design. Using apps like Onshape, you can apply a sectional view of your product. This drawing method must appear on the side of an orthographic or exploded view drawing as a sub-drawing.
Dimensions and annotations
An orthographic drawing is incomplete or a fail if there are not view labels, measurements and detailed annotations around the drawn views. Ensure you have provided measurements for even the smallest components of your product design. The more accurate and thorough you are when displaying all the dimensions of your product, the higher your marks will be!
Sub-assemblies & magnified detail views
If your product idea is only made of one piece or component, marks will be reduced for lack of complexity. Your product should have multiple parts that attach and function together properly. When a product has multiple components that need assembly before being joined to the main assembly, then the product contains sub-assemblies. Your orthographic drawing can have a magnified detail view of such a sub-assembly with even more measurements and annotations for just that part. Check out the example page for a better understanding.
Example Page

11
Materials & Manufacturing Research
Key components on this page
-
Connecting to course theory
-
Mechanical & Physical Properties
-
of chosen materials
-
Real-world industrial manufacturing
process of product
Page Aim
The aim of this page is to add more secondary research for the specific materials and manufacturing methods your product will need. As you are creating a portfolio based on a UK curriculum of theory, this is a great opportunity to connect the structure and design of your product idea with textbook knowledge found in the Design & Technology course. Here, you are demonstrating relevant new research on the specific materials you have chosen with justifications why and how the materials will be used. In addition, this page also demonstrates your understanding of the specific machining and manufacturing processes needed to produce your product in larger quantities.
Connecting to course theory
As seen in the theory section of this website, there are many key terminologies and concepts in Design & Technology. Not all will relate to your product idea, however there will definitely be a few topics that cover something about your design idea. Use this page to make some direct links to the theory topics to show you are applying your new knowledge gained in this course.
Mechanical and physical properties of chosen materials
The mechanical and physical properties of the materials you have chosen will definitely be explained in the theory. To justify the specific materials and manufacturing methods needed to make your product, you can do physical material testing of sample materials in the workshop and document your findings. You can test hardness, toughness, bendability etc. Record your data and justify your material choices using the material's properties.
Real-world industrial manufacturing process of product
You can also use secondary research to learn about and describe relevant machining processes such as injection molding or die-cutting. Choose the processes that apply to the specific parts of your design based on their materials. This will demonstrate a realistic understanding of how your product will be made at scale if it is going to be batch or mass produced.
Example Page

12
Workshop Production Flow Chart
Key components on this page
-
Gather, Measure, Cut, Assemble (GMCA)
-
Quality control steps
-
Health and safety considerations
Page Aim
This is another very important page in your portfolio for both the grader and yourself too! The aim of this page is to clearly visualise the steps that need to be taken during the production of your product in the workshop. With a clear beginning, middle and end, a third-party manufacture can follow your production flowchart, ensuring they are checking their process for mistakes and preparing for the next steps. A clear production flowchart demonstrates that you have carefully planned out the process to the best of your predictions. Of course, unexpected things will happen along the way and steps might change. Any changes to the planned production process can be updated in this flowchart too.
Gather, Measure, Cut, Assemble (GMCA)
To help make a clear production flowchart, you can use GMCA. All product making follows these key steps in order so you can divide your flowchart into these four main sections. For added marks, an additional Finishing Methods may be added.
Gather
List all the materials and tools needed to be gathered before the production begins. Be very specific, taking note of every material that should be present during production. State the number of each materials and tool too
Measure
List out all the specific measurements for the parts of your product. Mention the tools and CAD softwares that will help in measuring the parts accurately. You want to show numbers in this section of the flowchart. Use millimetres.
Cut
This phase of the production is all about cutting or making. Mention the specific tools and machines needed to cut the materials into their measured shapes. CAM machines should be mentioned such as the laser cutter.
Assemble
In the final section of the production diary, mention all the tools and adhesives needed to put all the parts of your design together. Be specific on the names of assembly tools such as PVA wood glues or nuts and bolts.
Finishing methods
In addition to the assembly phase, you can also detail how your product is finished. Mention sanding, painting and sealing if necessary.
Quality control
Your production diary will not be complete until each step has a quality control measure taken. This means between the steps, there is a description of what could go wrong and a solution that needs to be done in order to continue to the next step. Consider each quality control step like a detour in the journey to make sure possible problems are identified with a solution. These problems may or may not happen, but it is good to show your thorough planning this way.
Health & safety considerations
Another way to score higher marks on this page is to show your respect and awareness for possible risks and health and safety concerns during the production. Between some steps in the Cut and Assemble phase, mention and highlight specific health and safety equipment and procedures that are needed to avoid injury. These include safety googles, dust masks or proper training on a specific machine before use. Your aim is to ensure whoever is following the production flow chart is safe at all times.
Example Page

Section 5: Realising design ideas
Production Diary 3D Modelling (Page 1)
Key components on this page
-
Thumbnail images of Onshape 3D modelling
-
Detailed captions and descriptions
of CAD 3D tools -
CAD modifications and updates
-
Testing
13
Page Aim
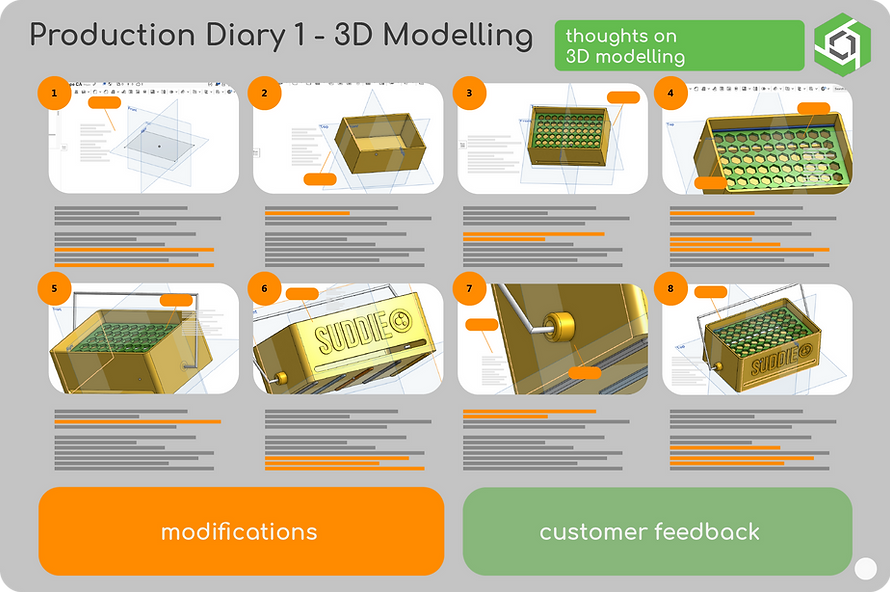
Welcome to the beginning of the production diary section! This section of the portfolio will log and detail every step of the actual making of your product design. At this beginning CAD stage, you will be spending time digital 3D modelling your product in Onshape or any another precision 3D modelling program. Nothing in your production should suddenly appear without the process being shown. On this page, you will demonstrate specific tools used in the 3D program to create your final product model. The final result of your 3D model will be used for 3D printing, orthographic projection drawing and sectional views so it is important to get your 3D model as accurate as possible in shape and sizing.
Thumbnail images of Onshape modelling
Similar to the Youtube homepage, this page will have a series of thumbnails with captions describing each step of your 3D modelling journey. Make sure to screenshot the entire screen as you are working so the side panels and app environment can be seen. You can zoom in and screenshot specific menus and tool buttons in the program for added detail.
Detailed captions and descriptions of CAD 3D tools
Document the specific tools, actions and clicks done to create your model. Bold the tool, button and action names in the captions so the grader has a quick glance of the digital tools you used.
CAD modifications and updates
As you 3D model your final product idea, you will undoubtedly discover necessary changes and updates to the design, especially as you get more comfortable using more advanced steps in 3D modelling. Make sure to document these changes in the captions below the thumbnail screenshots as well as the Specifications page earlier on in the coursework.
Testing
When you complete your 3D model, you are encouraged to test your final model in some way. One method is to ask potential customers for their final feedback on the model before making it for real. Gather customer ratings and quotes and present them somewhere on this page to show on-going customer evaluation and testing.
You can also test your 3D model for strength using digital Finite Element Analysis apps. This is optional and requires access to specific programs, however performing these forms of digital analysis will score much higher marks if analysed accurately.
Example Page
Major Design Revision (MDR)
Key components on this page
-
Twin Theory's notable iterative change in
design feature -
Natural discovery or intentional
'Eureka!' moment -
Secondary research & evaluation of
design change -
Customer feedback on revised design
14
Page Aim
This page is Twin Theory's trademark tactic for ensuring higher marks! Known as the Major Design Revision or MDR, this page will highlight a notable change in your product's design, function or overall approach to customers. Essentially, completing the content on this page will force you to be iterative in your designing, demonstrating flexibility in updating your design and taking risks for the benefit of improving your idea for your customer's needs. The MDR is not a complete design overhaul of your idea; instead the page focuses on one or more features that you may have mistakingly overlooked or approached incorrectly in your design. Perhaps the size and shape is wrong, or the materials chosen is inappropriate for the function of the design. The MDR could also be the addition of a new feature or approach that enhances the product's function. It does not have to be a problem, it could also be a better solution discovered. This page aims to address and problem solve the revelation through additional research & understanding.
Example: Let's say you are designing a new type of feeding tray product for cats. Your design uses sustainable cardboard for the tray, which allows the food to be eaten directly off the tray by the cat while still being sustainable. Unfortunately, you have overlooked that cardboard can break down when in contact with water or the cat's saliva, therefore presenting a risk that the tray may fall apart or lose strength over time. To problem solve this, you will research a food-safe polymer material instead. You will show research on the absorbency, sanitary and strength properties of this new material which will then be incorporated into your design specifications.
Natural discovery or intentional 'Eureka' moment
The MDR can happen naturally at any point in your portfolio, even during the production making phase. If your design error or discovery does not happen naturally and your design and making process is looking too smooth and steady, you can intentionally perform an MDR by finding a reason to change a design element in your product. Twin Theory likes to call this moment in your portfolio the 'Eureka' moment, a term coined by Albert Einstein when a sudden solution happens!
Secondary Research to support design change
Once you have determined what element of your design you are going to change, you can perform more secondary research. It is alright if you do primary and secondary research during the later stages of your portfolio as it shows on-going knowledge discovery. Provide as much research as needed into this new design approach or solution, showing examples of how the new MDR will positively affect the ACCESSFMM of your product and your customers.
Customer feedback on revised design
Now that you have made a design change to your idea, as always you need to check what your potential customers think. Collect some customer quotes or survey data on the impact of your design change. Has the change been positive for the design and funciton of your product? Is the change a noticeable improvement in your customer's opinion? Place this data on the page.
Example Page

Production Diary Physical Making Cont'd (Page 2)
Key components on this page
-
Thumbnail images of production
-
Effective captions and descriptions of steps
-
CAM steps
-
Modification logs and updates
15
Page Aim
After 3D modelling your product design, the rest of the production diary documents the physical making of your product in the workshop. This page aims to demonstrate your use of practical skills using tools, machines and assembly methods to realise your product. Effort and care in the process is incredibly important, so take loads of pictures of each major step during your making. Take notes of problems and solutions as they occur during the making so you don't forget!
Thumbnail images of production
The production diary follows the same format as the 3D modelling page. Resize your making photos to an appropriate size so it is clear what is being shown in each step. Make sure not to distort your images and crop them if needed.
Effective captions and descriptions of steps
Each thumbnail must be accompanied with a caption that describes what actions, tools and procedures are happening in the picture. Mention health and safety steps taken when working with materials or chemicals. Make sure to discuss problems or mistakes that happened in the step and how you solved the issue to keep moving forward. Finally, add labels to the photos that point out materials, tools or parts.
CAM steps
As part of your physical production, it is best to use CAM machinery to support your making. These include laser cutters, 3D printers or CNC machines. If a part is made using a CAM process, you can score higher marks by indicating the settings, steps and health and safety considerations used to run the machine. Be specific how the machine was setup to indicate you know how to work the CAM yourself safely.
Modification logs and updates
Throughout your production diary, present notes of design changes and decisions that impact the final outcome of your intended product. There will definitely be changes, either minor or massive. Make sure to document them, especially if they affect the Specifications of your product's design. You can highlight any changes during production by using a different text colour in the captions.
Example Page

Production Diary Physical Making Cont'd (Page 3)
Key components on this page
-
Same as previous page
16
Example Page

Section 6: Analysing & Evaluating
Customer Feedback & Evaluation
Key components on this page
-
Post production customer feedback
-
Customer testing
-
Post production self-evaluation
-
Final evaluation against Specifications
17
Page Aim
Congratulations! You have completed your 3D & physical product model! Though the hard work is done, the entire portfolio will be meaningless if you don't carry out a final evaluation of your project and the outcome. This page aims to demonstrate your careful analysis of not only your process and product journey, but of your own growth as a product designer as well. The overall impression of this page is to show your understanding that what you have made is just a prototype and your idea is far from being truly final and ready for the market. You must demonstrate that there are still modifications, improvements and production problems that can be improved.
Post-production customer feedback
Now that your product prototype is fully made, you can gather more specific feedback from customers about what they think about your product's form and function. You can ask for customer opinions using ACCESSFMM as a framework for your questions. Collect their responses and present them on this slide.
Customer testing
Allow some potential customers to get hands-on with your product. Observe and document their interaction with your product prototype and state any positives or negatives they may experience with the design and function of your prototype. Take pictures of the customer using your product. For higher marks, discuss the ergonomic quality of your product as the customer interacts with the design. Is the prototype correctly sized? Is it safe for the user? Is the weight appropriate for the product's purpose? Are the materials strong and sturdy enough to last a long time?
Post-production self evaluation
You just completed a very long design journey. Along the way, you will undoubtedly have experienced new skills, knowledge and experience in CAD and manufacturing. Describe how the project has developed you to be a better designer. You can also describe the low-points or struggles you have had in the project. Be as critical about yourself as possible which shows honesty and room for growth. In addition to practical skills, you can also describe your soft-skill development, such as your organisation, planning, commitment, communication and collaboration skills.
Final evaluation against Specifications
In this section on the page, you can evaluate the actual final outcome of your product against the Specifications you laid out before production. For example, you can choose a few or all of the ACCESSFMM specifications you set earlier and evaluate how & why they have changed compared to your final physical outcome. Alternatively, if you have been updating your Specifications table along your journey, you can refer the reader back to the Specification page which will have the updates and reasons already logged.
Example Page

Future Modifications
Key components on this page
-
SWOT analysis of product outcome
-
Future design changes and revisions
-
Evaluation of project management skills
-
Evaluation of personal learning journey
18
Page Aim
This is the final evaluation page and the last major writing page in your coursework! Well done for making it this far! To wrap up your product design journey, this page aims to demonstrate your visualisation of how to improve your product and design journey if you had to design and create your project all over again. What changes would you make to the process? What changes would you make to your design to enhance or make it more practical and efficient? Answering these questions will demonstrate that you have learned so much about the iterative design process and how to continually improve your design process to meet customer needs.
SWOT analysis of final outcome
This section on the page is optional, however it is a great way of describing your product's final outcome in an easy to understand format. A SWOT analysis is an industry tool for understanding the potential strengths and weaknesses of an idea, service or product. SWOT stands for Strengths, Weaknesses, Opportunities and Threats.
Strengths
Discuss the strengths of your product's design and market presence. Does your product meet the demands of consumers? Does it function safely and with a purpose? What specific parts of your product design are particularly impressive for customers?
Weaknesses
In what ways is your final outcome in need of improvement? Are there any areas of the product that are weak. This could be physically weak or weak in the sense that is not meeting customer needs, unsafe or inefficient for manufacturing.
Opportunities
Now that your product prototype is made, what further opportunities for design development are possible? How can the design be improved, enhanced or redirected to meet more customer's needs? Can you identify more potential gaps in the market where your product could be tweaked to help, for example another industry entirely?
Threats
The consumer product market is full of competition. Are there any other products or companies that pose a threat to your design. Could they outsell you or do they have a similar product that is better than yours in some way? What would you need to do next time to compete better? Is your product unsafe which could pose a threat to sellability?
Future design changes and revisions
If you had to repeat the entire project journey again and still make the same product, how might you go about the design differently? You can refer to your Specifications and ACCESSFMM to address key areas in your product's design that you could change, such as materials, manufacturing methods or the size. Detail the suggested improvements and how the improvements will impact a future final outcome of your prototype.
Evaluation of project management skills
If you had to repeat the entire project journey again and still make the same product, how might you go about your project management and planning differently? Are there any areas of your schedule that need improvement? Did you suffer from procrastination or difficult time management due to other commitments? How could you solve any issues next time to avoid difficulties in managing your project? Be as open and honest as possible when critically analysing how you could improve your process for the future.
Evaluation of personal learning journey
As a nice conclusion to the major writing of your coursework portfolio, you can end the portfolio with a section reflecting on your learning and personal journey. This section is different to the self-evaluation on the previous page. Instead, talk about your future and how the skills and knowledge gained in the course will help you be a better worker, designer and person in the future. If you feel the project did not help you this way, you can openly admit this as well. Just be very specific how and why the project did not help you and what possible areas of this journey could apply to other tasks and jobs you are interested in. Be more positive and show a keen enthusiasm for the future of designing.
Example Page

Product Gallery & Vanity Shots
Key components on this page
-
High resolution product photoshoot
-
Multiple angles & special feature zoom-ins
-
Blender renders with lighting,
textures and effects
19
Page Aim
This page will present visuals of your final product prototype in all it's glory! No further writing is required on this page except for labels indicating views or short captions. The page is mostly large and clear images of your final product and serves as a final gallery for the grader to see your final outcome using photography and 3D renders.
High resolution product photoshoot
This page is an opportunity to show off your creation. Make sure to take high resolution pictures of your product that are clear. For a more professional finish, place your product in a photo studio environment with planned lighting. In addition, make sure to take pictures of your product in the environment it is used in. Do not present any distorted or pixellated images of your final product.
Multiple angles & special feature zoom-ins
Don't be afraid to get up-close when taking pictures of your final product. Take pictures of your product from a variety of angles. If your produce has a special feature or a feature that shows impressive design skills, take some zoomed in photos to highlight those areas of the design.
(Optional) Blender renders with lighting, textures and effects
Though you can present digital 3D images of your product using Onshape, the appearances and lighting options in Onshape are very limited. If you want to score higher marks, you can transfer your Onshape model into a 3D rendering program like Blender. Blender has options for adding realistic lighting, backgrounds, textures and colours to your model. This step is optional but Blender can do an amazing job at making your final product look professional and realistic!
Example Page

Bibliography & Citations
Key components on this page
-
Why do I need to cite?
-
Full Chicago/MLA citation format
-
No website links only
-
ChatGPT & the responsible
use of AI -
Minimum 10
20
Page Aim
The main aim of this page is to protect you and the work of others. As this portfolio relies on a lot of research and resources as well as designed content by you, it is very important to reference or cite sources you have used. This demonstrates your respect and appreciation for the work of others. This includes the work others have put in to writing articles, creating videos, making websites, sharing their research etc. If you do not create a citations page, or cite within the pages of your portfolio, you are required to declare all citations on a candidate record form along with the submission of your portfolio. It is easier to create this page to avoid having to handwrite all your sources on a form.
Full Chicago and MLA format
Make sure your citations are created following a standard format. Chicago and MLA formats are the best for citing your sources. You can use websites like easybib.com to quickly generate your citations using only website links.
No website links only
A common mistake is copy and pasting website links as citations only. Please avoid this as graders are under no obligation to open links in your digital portfolio file as it could result in viruses on their computer. Ensure to follow standard citation formats.
ChatGPT and the responsible use of AI
This is an incredibly important requirement for this page. The use of AI is quickly becoming the standard for students and workers around the world. As the portfolio is a design journal, all writing must be your own. The use of ChatGPT is allowed only in the case of research and generating ideas, however generative AI cannot be used to write on your behalf. To ensure you are cleared from any potential accusations, make sure to clearly cite which AI apps you used to support your development. Write a disclaimer explaining how you used AI responsibly and with integrity during the whole project.
Minimum of 10 citations
Ensure you have cited at least 10 sources of information in the proper format. Having only a few citations may affect your grade negatively as it may indicate you did not research enough or record your research along the design journey.
Example Page
